Getting Started
Here you will find a guide on how to set up Saros. If you still need to install Saros, you can have a look at our installation guide.
After that you might want to find out what Saros can do: Here is the complete feature list.
The Host
Before we get started, you should know that Saros is a host-based system.
- You are the host if you start the session.
- If the host leaves the session, it is closed for everyone.
Get familiar with the Saros UI
If the Saros View is not already open, open it:
- Click
Window > Show View > Other... - Select the
Sarosview and clickOpen
The Saros View consists of three parts
- the contact list
- the session list
- the chat area
The contact list is where all your contacts are, allowing you to check their availability, send them instant messages, and invite them to Saros sessions.
When you are in a Saros session you will see all participants in the session list. Furthermore, the session list indicates
- which participant has which color,
- which participant has which editor focused, and
- which participant is currently following whom.
See the awareness information page for more information concerning visualizations indicating the participant’s actions.
Saros also provides instant chat messaging to accompany your sessions. Whenever you begin a Saros session, a chat session is also automatically started.
If you want to configure Saros, open the Saros entry in the menu bar
and click on Preferences.
This is an alpha. See here for restrictions.
Most interactions with the Saros session logic (like starting or ending a session) can be done through the Saros tool window.
This window is attached to the bottom right of the IDE by default.
It is marked with the title “Saros” and the Saros icon (![]() ).
All actions described in the following sections take place in this tool window.
).
All actions described in the following sections take place in this tool window.
Start a Session
In the following we show you how to set up Saros to start your first session.
Step 1: Creating an XMPP Account
You first need an XMPP account to use Saros.
- You can create a new account:
- On our XMPP server using our signup page
- Note: Due to abuse by spammers, we had to disable in-band registration and from within Saros.
- On other XMPP servers as jabber.org (register.jabber.org).
- On our XMPP server using our signup page
- You can use an existing account
- Please note that your performance may vary depending on the XMPP server settings, such as bandwidth restrictions or feature supports.
- It is recommended to use the same XMPP server for all users which participate in a Saros session. Our tests have shown that many public XMPP servers use outdated software and certificates. Thus in many cases communication between federated servers will fail.
Step 2: Adding Account and Connecting
Now you can start the Saros Configuration wizard (Menu > Saros > Start Saros Configuration) to configure your account in Saros and connect.
This is an alpha. See here for restrictions.
- In the top bar of the Saros view, click the “Connect” button (
 ).
). - Choose “Add account…” from the pop-up menu.
- Enter the fully qualified user name (
USER_NAME@YOUR.DOMIAN) of the account you would like to add.- If the basic Saros XMPP server is used, the domain would be
@saros-con.imp.fu-berlin.de.
- If the basic Saros XMPP server is used, the domain would be
- Click OK.
- Enter your password.
- Click OK.
- Enter the XMPP server address (optional).
- This option should not be necessary in most cases.
- If no server is supposed to be specified, just leave the field empty.
- If a server is specified, a port has to be specified as well.
- Click the “Connect” button ().
- Choose the account you would like to connect to from the pop-up menu.
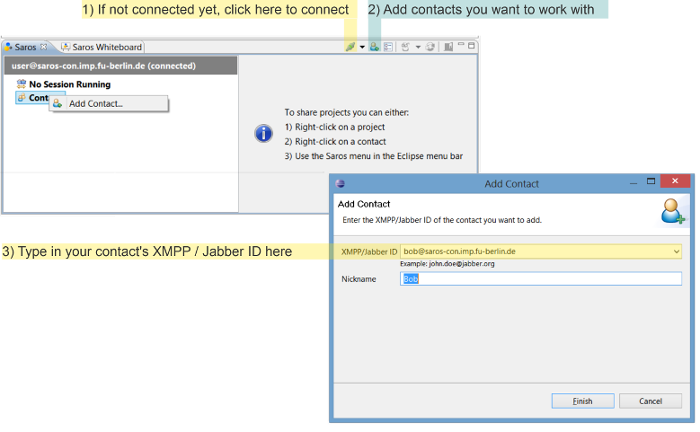
Step 3: Adding Contacts
To add a contact to your list you need to know his/her XMPP ID.
After entering your partner’s XMPP ID, a message will be sent to your contact. Once they accept your request you will be able to see their online status in your contact list.
This is an alpha. See here for restrictions.
- Connect to the XMPP account you would like to add a contact to.
- Click the “Add Contact” button (
 ).
). - Enter the fully qualified user name (
USER_NAME@YOUR.DOMIAN) of the contact you would like to add.- If the basic Saros XMPP server is used, the domain would be
@saros-con.imp.fu-berlin.de.
- If the basic Saros XMPP server is used, the domain would be
- Click “OK”.
- Enter a nickname for the contact (optional).
- Click “OK”.
- An additional dialog will be shown if the server does support user status requests. This does not impact the contact addition process, which can still completed by simply clicking “OK”.
Once the other user has accepted your contact request, they will request you adding them as a contact as well. This will automatically be displayed by the plugin as a dialog when you are connected to the account.
Step 4: Starting and Joining Sessions
You can work together with your contacts by either starting your own session or by being invited to one.
When starting a session, Saros will produce the same project state in the Saros instances of your invited contacts (with synchronizing files, copying missing files or creating missing directories).
Start a Session (Host)
- Right-click on…
- a project in your Package Explorer and select Share With or
- a contact in the Saros View and select Work Together on
- Wait for your contacts to accept the session invitation
This is an alpha. See here for restrictions.
- Connect to the XMPP account you would like to use.
- Choose the section “Contacts” in the window on the left side of the Saros view.
- Choose a friend that is online.
- Right-click the name of that friend. This will open a list of all open projects. Each project contains a list of its shareable modules.
- If the module you would like to share is not listed, it most likely does not adhere to the mentioned restrictions (see module restrictions).
- Choose the module that is supposed to be shared from the displayed list of modules.
Alternatively:
- Select a module in the project view and right-click it.
- Select “Share With…” from the options (or use the keyboard-shortcut ‘s’).
- Select a user from the list (or use their number as the keyboard-shortcut).
Current restrictions
Number of Participants
Currently, Saros/I is restricted to two-participant sessions, meaning you can only create session containing the host and a single client.
Share only a single module
You can currently only share a single module. A module has to adhere to the following restrictions to be shareable through Saros:
- The module must have exactly one content root.
Sharing a module will only share resources belonging to that module, not resources belonging to sub-module located inside a content root of the module. Creating such a sub-module during a session will lead to an inconsistent state that can not be resolved by Saros. See Known Bugs.
Working With Newly Created Modules
To share a newly created module, you will have to have saved your project at least once before trying to start a session. This is necessary as the module file for a new module is only written to disk the first time the module is saved.
You can check if the module file was written to disk by looking at the base directory of the module. It should contain a *.iml file with the same name as the module.
Sharing Complex Modules
Even though Saros offers the option to create the module on the client side as part of the session, this should only be used for relatively simple modules. For more complex modules, it is advised to share the module structure some other way (e.g. a VCS) before starting a session. Saros currently does not set up things like libraries or module dependencies, meaning they would have to be configured by hand.
Join a Session (Client)
- Wait for a session invitation to appear on your screen
- Click Accept to accept the invitation
- Tell Saros where to save the incoming project:
- You can create a new project, or
- synchronize with an already existing project on your computer.
- Select Finish and wait for the project to be copied to your computer
This is an alpha. See here for restrictions.
- Connect to the XMPP account you would like to use.
- Wait until the host invites you to join their session.
- After the host invited you, the session negotiation will open.
- Click “Next”. This will open the project negotiation.
- Choose which project to use. This can be done through the drop-down menu at the top of the dialog.
- Choose how to represent the shared module locally. You can either choose an existing module or create a new one
- To create a new module: Choose “Create new module”
- Specify a module name (must not already exist in the shared project).
- Specify the module base path.
- To use an existing module: Choose “Use existing module”
- Select a module from the drop-down menu.
- If the module you would like to share is not listed, it most likely does not adhere to the mentioned restrictions (see module restrictions).
- Select a module from the drop-down menu.
- To create a new module: Choose “Create new module”
- Click “Next”.
- If an existing local module was chosen, a list of local file changes that will be made during the negotiation will be shown. These are the differences between the local version of the module and the version held by the host. The shown actions are the actions necessary to align the local module with the host module.
- Warning: Any local differences will be removed during the project negotiation. These adjustments will only be done if the “Finish” button is selected. If the project negotiation is aborted at this stage, no local files are changed.
- Click “Finish”.
Additional Information:
- If you accept an invitation and decide to synchronize the incoming project with your own copy, Saros will automatically add, change, or delete all files as necessary.
- Saros will share all files which are not marked as derived by
Eclipse or excluded by IntelliJ platform based IDEs, because it should be possible to recreate such files
(
.classfiles for instance) at the client’s side. If you use a build tool such as Maven, it might be necessary to manually set the resulting files or folders to derived or excluded on both the host’s side (so they won’t be copied to the client) and the client’s side (otherwise the files will be deleted on synchronization).
End a Session
Leaving a Session - Host
- Click on the “Terminate session” button (
 ).
). - Select “OK”/”Yes”.
- As you are the host of the session, this will cause the session to end, kicking all other participants.
Leaving a Session - Client
- Click on the “Leave session” button (
 ).
). - Select “OK”/”Yes”.